
StudioMini XL is being retired, and future development is now focused on StudioMini 3 for iPhone and iPad.
This guide explains how to move your StudioMini XL projects to StudioMini 3 using the new export feature added in StudioMini XL 2.2.8.
Overview
To move your projects from StudioMini XL to StudioMini 3:
- Update StudioMini XL to version 2.2.8.
- Export your projects from StudioMini XL.
- Install StudioMini 3.
- Import the exported project files into StudioMini 3.
We recommend keeping StudioMini XL installed until you have confirmed that your projects open correctly in StudioMini 3.
StudioMini XL is being retired
We released StudioMini for iPhone back in 2009, and it slowly gained the trust of musicians around the world. When the original iPad was introduced, we created StudioMini XL as a separate iPad app, since Universal apps did not yet exist.
StudioMini XL for iPad was released in 2010 and became an important part of many musicians’ recording workflows.
In 2024, we released StudioMini 3 with major improvements and new features. Initially available only on iPhone, StudioMini 3 has continued to grow and evolve.
With the release of StudioMini 3.5, StudioMini 3 now fully supports both iPhone and iPad as a single Universal app.
StudioMini XL 2.2.8 is the final release of StudioMini XL as a separate iPad-only app. Existing users can continue using it and can re-download it from the App Store if needed. However, StudioMini XL will no longer receive updates and will be removed from sale.
We recommend moving to StudioMini 3 if you would like access to future updates, improvements, and new features.
Before you begin
Before migrating your projects:
- Make sure StudioMini XL is updated to version 2.2.8.
- Install StudioMini 3 from the App Store.
- Make sure you have enough available storage space for exported project files.
- If possible, back up your device before migrating important projects.
Export your projects from StudioMini XL
- Open StudioMini XL.
- Go to Recordings and choose the project you want to migrate.
- Return to the main StudioMini XL screen.
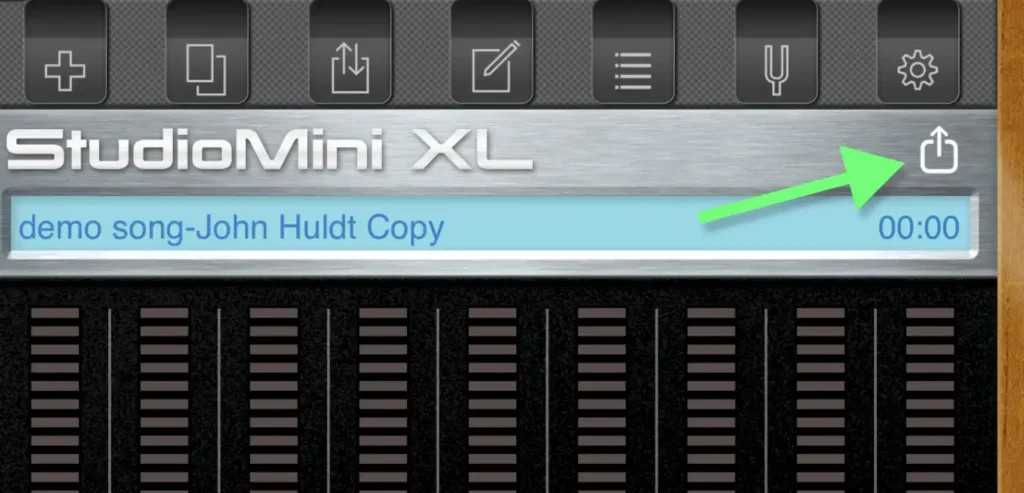
- Tap the new Export button.
- Tap Save to Files.
- Choose a location to save the exported ZIP project file.
- Repeat these steps for any additional projects you would like to move.
Import your projects into StudioMini 3
- Open StudioMini 3.
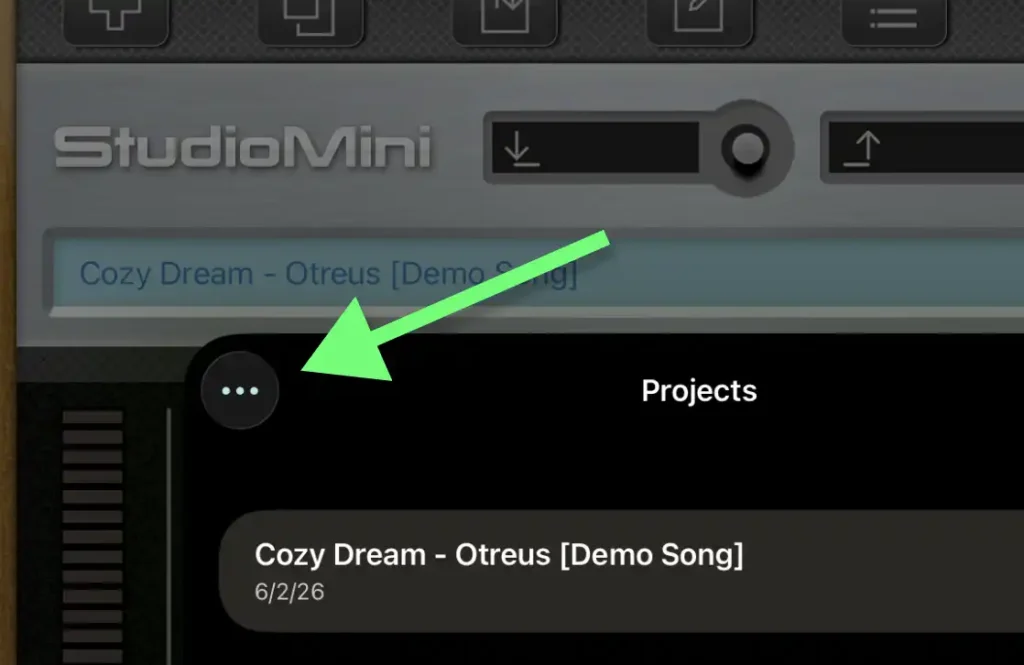
- Go to Projects.
- Tap More in the top-left corner.
- Tap Import Project.
- Navigate to the location where you saved your exported StudioMini XL ZIP file.
- Select the ZIP file to import the project.
- Once the import is complete, your project should appear in the StudioMini 3 project list.
After importing
After importing your project, we recommend:
- Opening the project and checking each track.
- Verifying that recordings, mixes, and edits transferred correctly.
- Playing the project from beginning to end before deleting any originals.
Keep StudioMini XL installed until you are fully comfortable that everything transferred successfully.
Need help?
If you run into any problems during migration, please contact us through the app or directly at [email protected]
Thank you for supporting StudioMini over the years!